Model Viewer
The Model Viewer is a plugin tool for the C4 Engine. It is used to preview dynamic models and to import animations for those models.
Opening a Model
The Model Viewer is opened by selecting Open Model from the C4 Menu, or by typing model [name] in the Command Console. If the Open Model menu item is selected (or name is omitted from the console command), then a dialog appears to let you select a model resource.
Model Viewer Layout

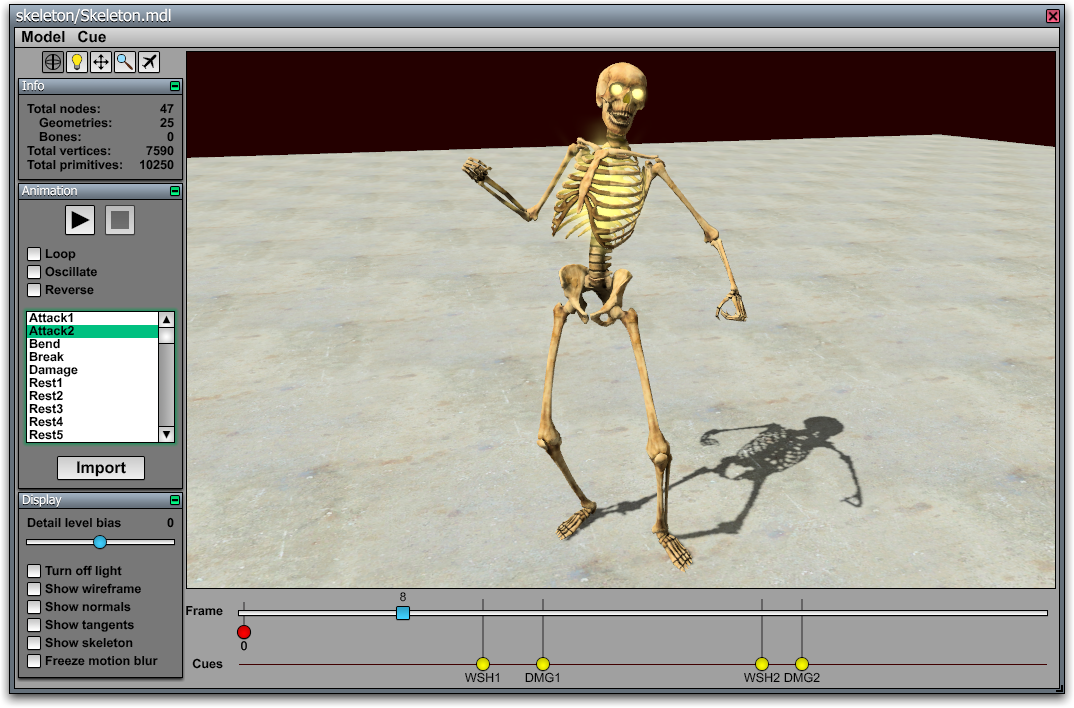
The Model Viewer window has the layout shown in Figure 1.
Tool Buttons
|
Icon |
Shortcut |
Function |
|
1 or Alt with the Light tool |
Orbit Model. Orbits about the center of the model. | |
|
2 or Alt with the Orbit tool |
Move Light. Moves the light source about the center of the model. | |
|
6 or Alt key with any tool |
Scroll Viewport. Dragging with this tool pans the viewport. | |
|
7 or Mouse Wheel with any tool |
Zoom Viewport. Dragging vertically with this tool zooms in and out of the viewport. | |
|
9 or Right Mouse Button with any tool |
Free Camera Move. When the mouse button is held down with this tool, the WSAD keys can be used to fly the camera around forward, backward, left, and right. The Space and C keys move up and down. |
Animation
The animation list shows the animation resources that exist in the same directory as the model resource. A model resource and its associated animations are typically grouped into their own subfolder somewhere within the Data directory. Animation resources have the extension .anm.
Selecting an animation from the list causes that animation to be activated. The animation can then be played using the controls at the top of the Animation page.
The slider below the viewport shows what frame of the animation is currently being displayed. It can be dragged to move the model into the pose for any available frame, and it moves automatically when an animation is being played. The two circular markers below the slider can be dragged to limit the animation to a specific range of frames.
The Loop, Oscillate, and Reverse check boxes control how the animation is looped and in what direction the animation is played.
Importing Animations

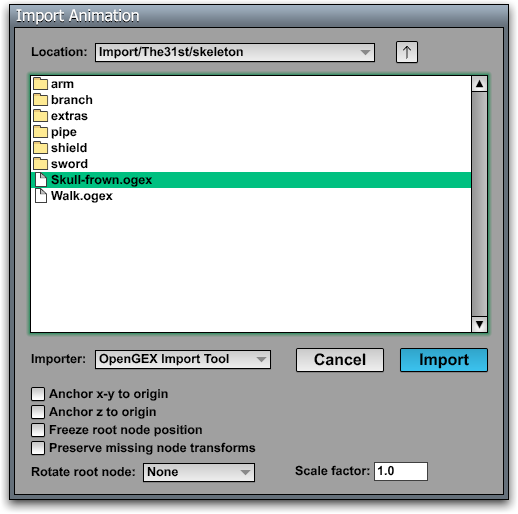
A new animation can be imported by clicking the Import button below the animation list. A dialog box then shows the animations that are available for import in the subfolder of the Import directory corresponding to the model's location in the Data directory. For example, if the model resource is in the Data/MyGame/MyMonster/ folder, then the animations would be imported from the Import/MyGame/MyMonster/ folder. The Import Animation dialog has the appearance shown in Figure 2.
When an animation is imported, differences between the up direction in the source application and in the C4 Engine are automatically resolved. You do not need to worry about the fact that your models may have been created in a setting where the y axis points up. (In the engine, the z axis points up.)
There are some options at the bottom of the import dialog that can be used to modify the transforms applied to the root node of the model when the animation is imported.
|
Option |
Description |
|
Anchor x-y to origin |
Forces the model to stay at the origin in the horizontal plane, but it is still free to move up and down. |
|
Anchor z to origin |
Forces the model to stay at the origin in the vertical direction. |
|
Freeze root node position |
Forces the root node of the model to stay at its current position, as shown in the model viewer. |
|
Preserve missing node transforms |
Preserves the current transforms, as shown in the model viewer, for any nodes not present in the imported animation file instead of resetting them to the identity. |
|
Rotate root node |
Can be used to apply a 90-degree or 180-degree rotation to the model about the vertical axis. This can be useful if the model is not facing the right direction. |
Display
In the Display page, the Detail level bias slider allows you increase or decrease the detail level for the model so that different LOD meshes can be seen, if present.
The check boxes can be used to display the information described in the following table.
|
Option |
Description |
|
Turn off light |
Turns off the light source that the model viewer adds to the scene. |
|
Show wireframe |
Shows the triangles as a wireframe overlay. |
|
Show normals |
Shows the normal vectors for all vertices. |
|
Show tangents |
Shows the tangent vectors for all vertices. |
|
Show skeleton |
Shows the bones for the model's skeleton (if present). |
|
Freeze motion blur |
Freezes the motion blur for the model when the animation is stopped. |